Wednesday, April 28, 2010

GRAND FINALE


A place for meditation?

7 STEPS FOR MAKING YOUR VERY OWN TRIANGULATED HUT!


1. Create curved surface in Rhino. Don't worry about perfection!


2. Apply Grasshopper parameter definitions: triangulate surface, label faces, fillet corners, add spaced holes.


Here is the resulting triangulated surface. Any desired adjustments can be done in Grasshopper and the Rhino file simultaneously updates the surface.


3. Export triangulated surfaces from Rhino to AutoCAD


4. Laser cut surfaces

5. Sand and apply surface treatments

6. Organize cut pieces with labels as a guide


7. Stitch pieces with desired connection material; rope, piping, zip-ties, etc.


Tuesday, March 30, 2010

Scripting


Thanks to wonderful blogs such as this one, I have found it is not too difficult to find Rhino scripts others have made on the Internet. I have shown the result of three such scripts that have been applied to the same surface. Playing with the parameters to adjust the shape, size, etc is easy enough...it is a matter of how to make the result printable that is yet to be discovered....

Thursday, March 18, 2010

Looking for flexibility

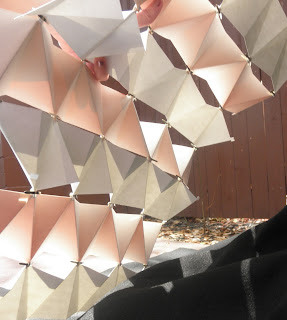
The triangulated wall panels work to create a flexible wall system that can adapt to the designer's needs. Variations in the triangle orientation create voids that angle towards either the interior or exterior. Exterior angled voids could direct fluids to drain to the interior, and interior angled voids permit sunlight to filter through. The voids can be increased or decreased in size simply by altering the size of the triangles. Flexible joints, such as these brass fasteners allow the wall system to mold to any desired shape.
Saturday, March 6, 2010

life size origami

http://www.grasshopper3d.com/video/real-rigid-origami

Wednesday, February 24, 2010

panelized filter


Umbrella or Filter


Waffling


Yet another possibility is waffling the desired shape creating an eggcrate like interlocking plane system. This is a waffling definition posted at www.liftarchitects.com. Worked great for me but you have to use different versions of grasshopper sometimes to get the definition to work. Often that means reinstalling the older version to make the definition work.

Stick building


This could be an interesting way to attack this; by stick building a frame of a desired complex shape. The struggle now is outputting the measurements of the "sticks", but the big question is how to construct and understand the multi port connection holding them together.

Panelize?


Every construction ends up being made up of smaller pieces. In order to build something large, things must be understood as an amalgam of connected things. Rhino and grasshopper allow you to divide something singular into multiple and thereby make it more possible to construct. Learning these programs programs makes this possible.

Conceptualization

For our digitally fabricated wall, we derived our concept from the Bromeliad, a tropical flowering plant. We were drawn to its ability to efficiently draw in water through its outreaching foliage.


As a group, we sketched out our intentions for the wall.


Intro by Dana Nielsen

Digital Project is a much more fierce animal than a Rhinoceros. The space navigator is a nice addition but is often lost in a sea of CATIA. Wish there was some way to keep it and
Digital Project running.

Deep thoughts during Digital Project Seminar Week

Day One: Seems real easy when the teacher does it

Day Two: Holy crap, how do you zoom in and out again?

Day Three: I feel I'm playing Russian Roulette every time I try and complete a command.

Day Four: Input: Digital Projection is intuitive. Output: False.

To fail is to learn


The final rendering of the object to be fabricated. As you can see, it has a sharp curve.


Section cuts


The material to be laser cut is 4 ply grey strathmore; therefore, a test cut was done to find the appropriate notch width for the final piece


Because the pieces to be laser cut were taken from rhino all the offsetting, trimming and line work needed to be done in CAD. This part particularly tedious because of the quantity of pieces. Better option anyone? Grasshopper?


Pieces were grouped and laid out according to the order they were to be assembled.


Looks like everything lines up...


As you can see the final object was unable to be put together. Although Rhino was able to digitally construct the model, we learned that in the real world, it was impossible to construct via an egg-crate method due to the sharp curve in the object.